Building a Smarter Network with EIGRP: Dynamic Routing in Action

As your network grows, so does the complexity of managing routes between devices. Static routing works, and RIP gets you started, but when you need more efficiency and flexibility, it's time to use something smarter.
That's where EIGRP comes in.
In this lab, we'll configure Enhanced Interior Gateway Routing Protocol (EIGRP) a dynamic routing protocol developed by Cisco. EIGRP is faster and more efficient than RIP, and it supports more advanced features like unequal-cost load balancing, route summarization, and rapid convergence.
We will go through the entire process, from assigning IP addresses to enabling EIGRP and verifying that our routers can automatically share route information.
Requirements:
- 3x 2911 Cisco Routers
- 2 x PCs (Pc0 & PC1)
- Ethernet Cables
Step 1: Build the Topology
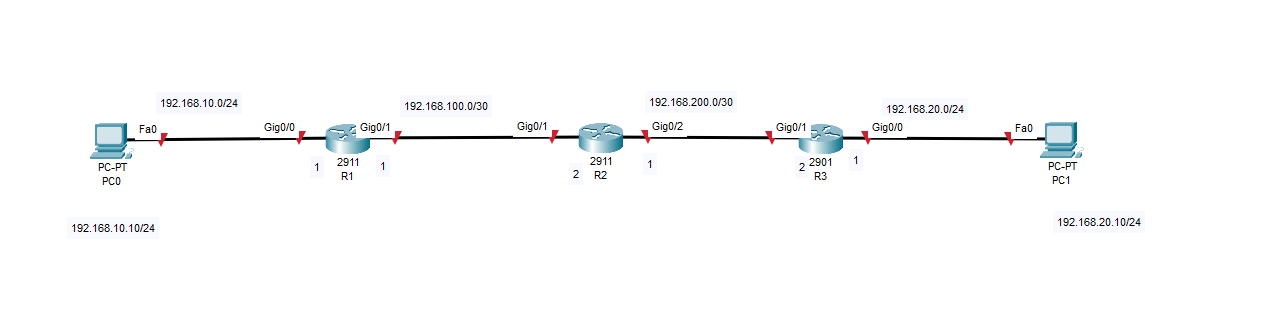
We will need to have PC0 on one side with three routers connected to each other and PC1 on the other side. The IP address information is below.
| Link | Subnet | Assigned IPs |
|---|---|---|
| PC0 ↔ R1 | 192.168.10.0/24 | PC0: 192.168.10.10, R1 G0/0: 192.168.10.1 |
| R1 ↔ R2 | 192.168.100.0/30 | R1 G0/1: 192.168.100.1, R2 G0/1: 192.168.100.2 |
| R2 ↔ R3 | 192.168.200.0/30 | R2 G0/2: 192.168.200.1, R3 G0/1: 192.168.200.2 |
| R3 ↔ PC1 | 192.168.20.0/24 | R3 G0/0: 192.168.20.1, PC1: 192.168.20.10 |
IP Address Table:
| Device/Interface | IP Address | Subnet |
| PC0 | 192.168.10.10 | 255.255.255.0 |
| PC1 | 192.168.20.10 | 255.255.255.0 |
| R1 G0/0 | 192.168.10.1 | 255.255.255.0 |
| R1 G0/1 | 192.168.100.1 | 255.255.255.252 |
| R2 G0/1 | 192.168.100.2 | 255.255.255.252 |
| R2 G0/2 | 192.168.200.1 | 255.255.255.252 |
| R3 G0/1 | 192.168.200.2 | 255.255.255.252 |
| R3 G0/0 | 192.168.20.1 | 255.255.255.0 |
The network topology should look like this:
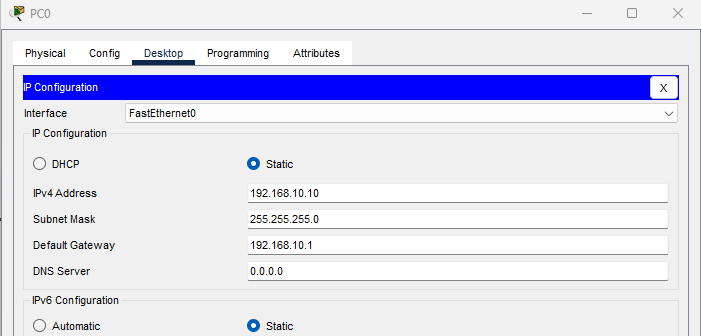
Step 2: Configure IPs on the PCs
On each PC, we need to assign a static IP, subnet mask, and default gateway. This ensures they can reach their directly connected router.
Pc0:
- IP: 192.168.10.10
- Subnet Mask: 255.255.255.0
- Default Gateway: 192.168.10.1
Pc1:
- IP: 192.168.20.10
- Subnet Mask: 255.255.255.0
- Default Gateway: 192.168.20.1

This gives each PC access to its local network and a path to other networks via the router.
Step 3: Configure Router Interfaces
Now we can assign the IP addresses and bring each interface up.
R1:
enable
configure terminal
interface g0/0
ip address 192.168.10.1 255.255.255.0
no shutdown
exit
interface g0/1
ip address 192.168.100.1 255.255.255.252
no shutdown
exit
exit
write memory
These interfaces connect R1 to PC0 and to R2. Each interface must be activated with no shutdown to bring the interface up.
R2:
enable
configure terminal
interface g0/1
ip address 192.168.100.2 255.255.255.252
no shutdown
exit
interface g0/2
ip address 192.168.200.1 255.255.255.252
no shutdown
exit
exit
write memory
R2 Sits in the middle of the network and bridges R1 and R3
R3:
enable
configure terminal
interface g0/1
ip address 192.168.200.2 255.255.255.252
no shutdown
exit
interface g0/0
ip address 192.168.20.1 255.255.255.0
no shutdown
exit
exit
write memory
R3 connects to Pc1 and to R2
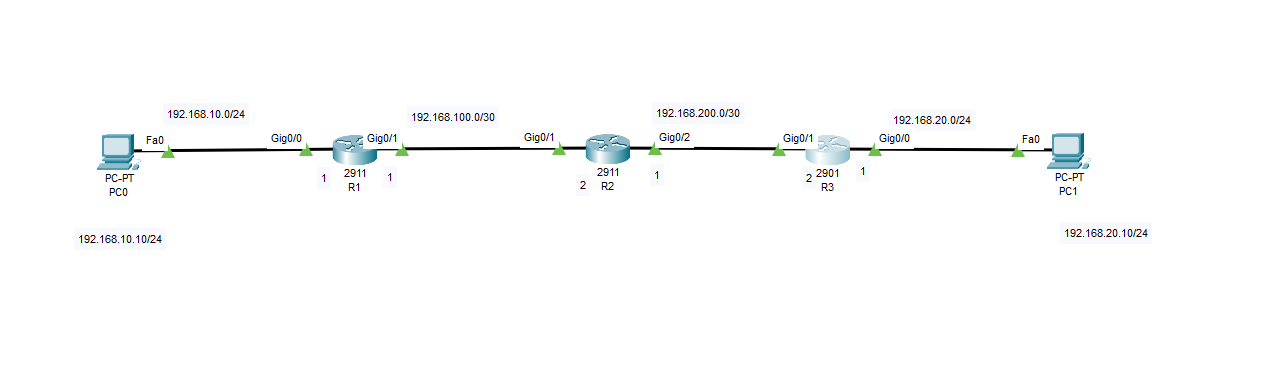
The network should look like this now:
Step 4: Configure EIGRP on All Routers
Now we are ready to enable EIGRP and advertise each directly connected network.
R1:
configure terminal
router eigrp 10
network 192.168.10.0
network 192.168.100.0
no auto-summary
exit
exit
write memory
R2:
configure terminal
router eigrp 10
network 192.168.100.0
network 192.168.200.0
no auto-summary
exit
exit
write memory
R3:
configure terminal
router eigrp 10
network 192.168.200.0
network 192.168.20.0
no auto-summary
exit
exit
write memory
The network statements tell EIGRP which interfaces to include. The no auto-summary command disables outdated classful boundaries for more control.
Step 5: Verify EIGRP Neighbors Relationships
Let's check to see if the routers have formed adjacencies with each other.
We can use the following command:
show ip eigrp neighbors

We can see that R1 is neighbors with R2.
We can do the following command above to check the rest of the routers.
R2:

R3:

This means that all routers are exchanging EIGRP hello packets and are ready to share routes.
Using the following command on the routers:
show ip route
We can look for marked letters with D to confirm that the routes are being learned by EIGRP. This confirms that EIGRP is working and routes are being exchanged.
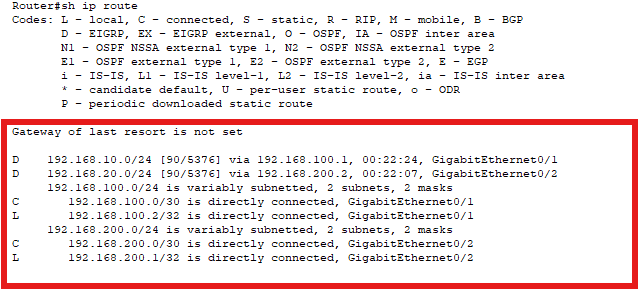
See the ip route table for R2, we can see that it's exchanging routes with EGIRP.
Step 6: Test End-to-End Connectivity
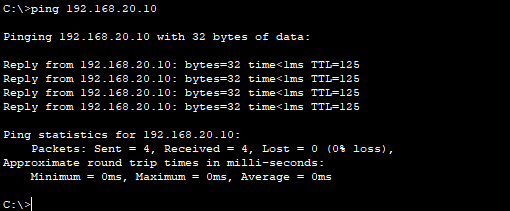
Now lets Pc1 from Pc0:
ping 192.168.20.10
Now do the same from Pc1 to PC0
ping 192.168.10.10
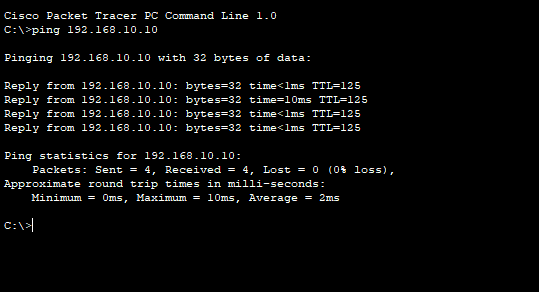
This now confirms that EIGRP is working successfully. We know now that EIGRP has successfully built a routing path and added the routes into this routing table.
Conclusion
That's it with EIGRP.
In this lab, we have set up a working network using Cisco's Enhanced Interior Gateway Protocol. We went from assigning IPs and bringing up interfaces, to forming EIGRP neighbor relationships and verifying dynamic routing between routers.
I hope you found this guide helpful and Happy Networking.