How OSPF Learns Routes and Builds the Network behind the Scenes

When you're building a network that needs to scale, manually adding static routes just doesn't cut it anymore. At a certain point, you want routers to share what they know automatically, accurately, and efficiently.
That's where OSPF comes in
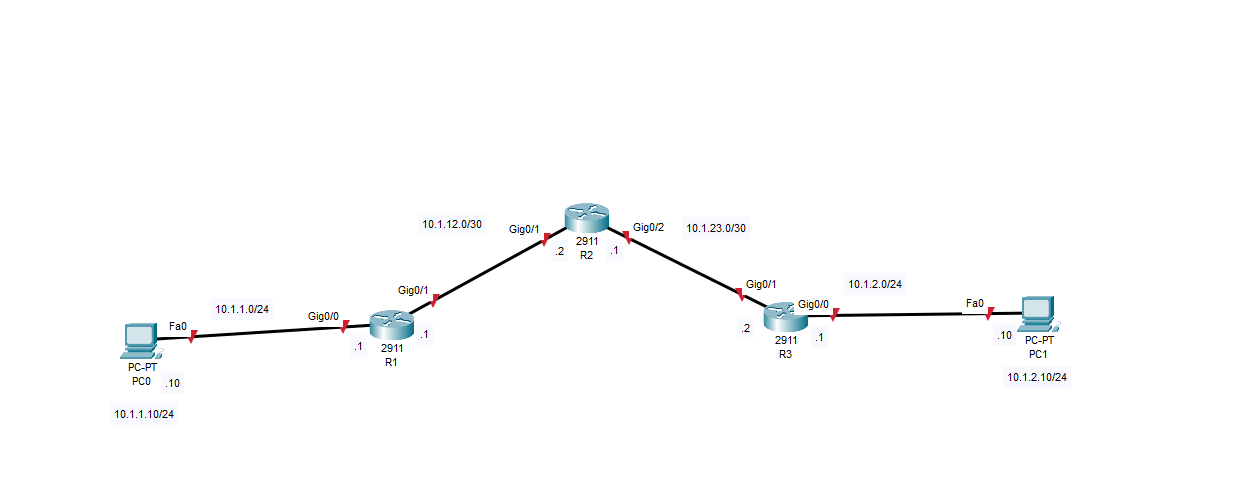
In this lab, we'll be setting up OSPF (Open Shortest Path First) in a single-area network across three routers and two Pcs. We will walk through IP addressing, interface configuration, OSPF setup, route verification, and connectivity testing.
Requirements
- 3 x 2911 Cisco routers
- 2 x Pcs (PC0 & PC1)
- Ethernet cables
IP Address Information
| Link | Subnet | Assigned IPs |
|---|---|---|
| PC0 ↔ R1 | 10.1.1.0/24 | PC0: 10.1.1.10, R1 G0/0: 10.1.1.1 |
| R1 ↔ R2 | 10.1.12.0/30 | R1 G0/1: 10.1.12.1, R2 G0/1: 10.1.12.2 |
| R2 ↔ R3 | 10.1.23.0/30 | R2 G0/2: 10.1.23.1, R3 G0/1: 10.1.23.2 |
| R3 ↔ PC1 | 10.1.2.0/24 | R3 G0/0: 10.1.2.1, PC1: 10.1.2.10 |
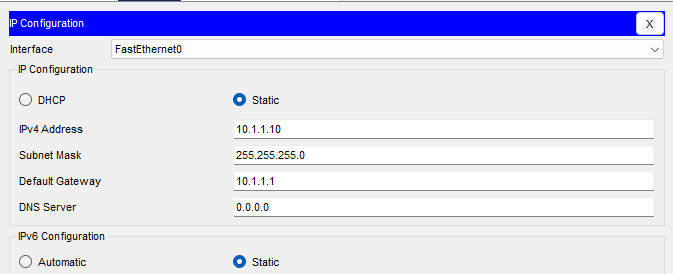
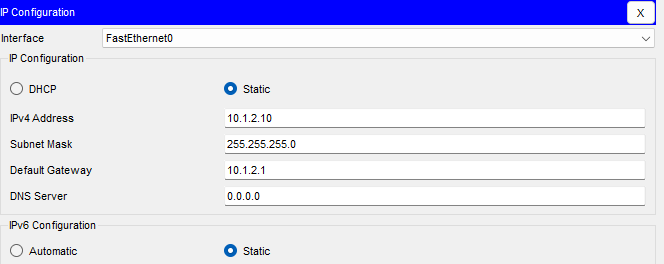
Step 1: Assign Static IPs to the PCs
We start by giving each PC a static IP, subnet mask, and default gateway. This allows them to communicate with their directly connected router.
PC0:
- IP: 10.1.1.10
- Subnet Mask: 255.255.255.0
- Default Gateway: 10.1.1.1.
PC1:
- IP: 10.1.2.10
- Subnet Mask: 255.255.255.0
- Default Gateway: 10.1.2.1
Your network topology should look something like this.
Step 2: Configure Router Interfaces
We need to give each router interface the correct IP and bring it up using the no shutdown command.
R1:
enable
configure terminal
interface g0/0
ip address 10.1.1.1 255.255.255.0
no shutdown
exit
interface g0/1
ip address 10.1.12.1 255.255.255.252
no shutdown
exit
exit
write memory
R2:
enable
configure terminal
interface g0/1
ip address 10.1.12.2 255.255.255.252
no shutdown
exit
interface g0/2
ip address 10.1.23.1 255.255.255.252
no shutdown
exit
exit
write memory
R3:
enable
configure terminal
interface g0/1
ip address 10.1.23.2 255.255.255.252
no shutdown
exit
interface g0/0
ip address 10.1.2.1 255.255.255.0
no shutdown
exit
exit
write memory
Step 3: Enable OSPF and Advertise Networks
Now the real magic begins. We'll enable OSPF with a process ID (1) and use network statements to define which interface participate in OSPF.
R1:
enable
configure terminal
router ospf 1
network 10.1.1.0 0.0.0.255 area 0
network 10.1.12.0 0.0.0.3 area 0
exit
exit
write memory
R2:
enable
configure terminal
router ospf 1
network 10.1.12.0 0.0.0.3 area 0
network 10.1.23.0 0.0.0.3 area 0
exit
exit
write memory
R3:
enable
configure terminal
router ospf 1
network 10.1.23.0 0.0.0.3 area 0
network 10.1.2.0 0.0.0.255 area 0
exit
exit
write memory
You might be wondering what is the 0.0.0.3 ?? These are wildcard masks, they tell OSPF which exact IP ranges to include. Every interface matching a network statements joins OSPF and starts sending hello packets
Step4: Verify OSPF Neighbors
While you have been configuring the OSPF, you may have been seen the router show this command:

This is a log message from OSPF, and it's basically telling us that it has successfully formed a full OSPF adjacency with the router at 10.1.12.1. on Gigabit Ethernet 0/1
We can verify that the routers are seeing each other with:
show ip ospf neighbor

Here we can see that R2 has formed neighbors with R1 and R2 on Gig0/1 and Gig0/2.
We can also check the routing table with:
show ip route ospf or show ip route

Routes with an O mean they've been learned via OSPF, this is your proof that OSPF is sharing information as expected.
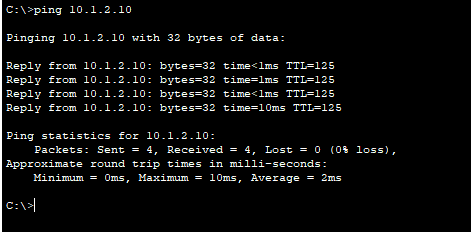
Step 6: Test End-to-End Connectivity
We can ping to test full communication across the network.
From PC0 to PC1:
ping 10.1.2.10
From PC1 to PC0:
ping 10.1.1.10
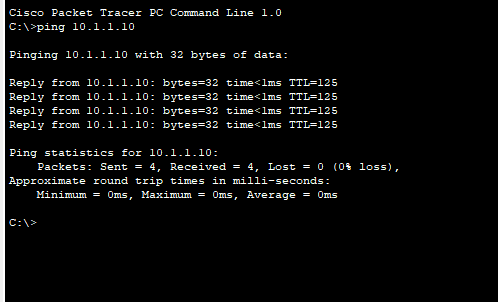
Perfect, we know now that OSPF is configured correctly, and our network is able to pass traffic successfully.
Conclusion
In this lab, we configured a multi-router using Single-Area OSPF, one of the most trusted and scalable routing protocols in enterprise networking.
You have learnt how OSPF forms neighbor relationships, shares route information, and keeps routing tables up to date, all without any static configuration beyond your edge subnets.
I hope this guide was helpful and Happy Networking.