Manually Routing Traffic Across a Multi-Router Network
Routers do a great job moving data between networks. However, only when they know where to send it.
In this lab, we'll explore static routing, which means manually telling each router how to reach remote networks. It's simple, predictable, and a great way to understand how routing works, before jumping into dynamic protocols like RIP, EIGIRP, or OSPF.
We'll build a network with three routers connected in a line, each with its own subnet, and configure static routes so that devices at both ends can communicate.
Requirements
- 3x 2911 Cisco Routers
- 2x PCs (Pc0 and PC1)
- Ethernet cable
Step 1: Build the Topology
- Add 3 routers (R1, R2, R4)
- Add 2 PCs (Pc0, Pc1)
- Connect Ethernet cables
- PC0 —> R1 (Gig0/0)
- R1 (Gig0/1 —> R2 (Gig0/1)
- R2 (Gig0/2 —> R3 (Gig0/1)
- R3 (Gig0/0) —> Pc2
The topology should look something like this:
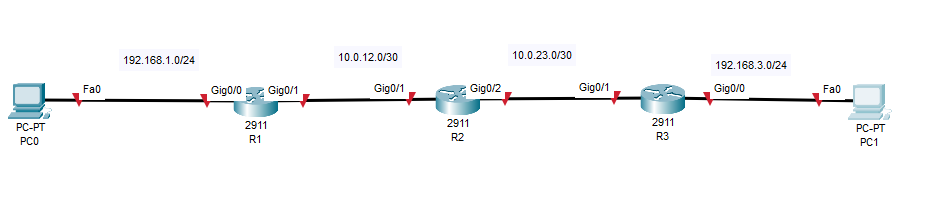
Step 2: Assign IP Addresses
We'll be working with three routers and two Pcs on the opposite side. Each router will be in its own subnet with a point-to-point link to its neighbor.
| Device/Interface | IP Address | Subnet |
|---|---|---|
| PC0 | 192.168.1.10 | 255.255.255.0 |
| PC1 | 192.168.3.10 | 255.255.255.0 |
| R1 G0/0 | 192.168.1.1 | 255.255.255.0 |
| R1 G0/1 | 10.0.12.1 | 255.255.255.252 |
| R2 G0/1 | 10.0.12.2 | 255.255.255.252 |
| R2 G0/2 | 10.0.23.1 | 255.255.255.252 |
| R3 G0/1 | 10.0.23.2 | 255.255.255.252 |
| R3 G0/0 | 192.168.3.1 | 255.255.255.0 |
We are using a /30 subnets for our point to point link as they only need 2 usable IPs. And we are using /24 subnets for our host network the PCs
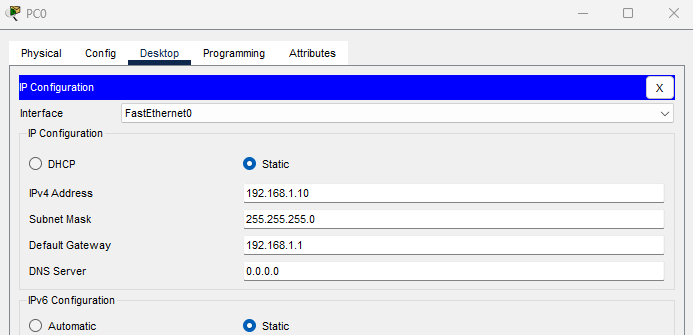
On the PCs:
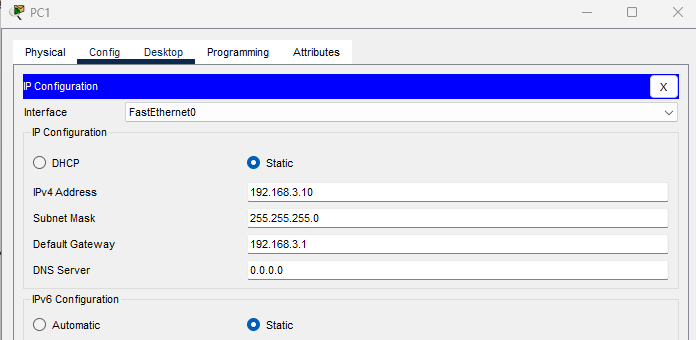
Open the Desktops —> IP Configuration tab and assign:
PC0:
- IP: 192.168.1.10
- Subnet: 255.255.255.0
- Gateway: 192.168.1.1
PC1:
- IP: 192.168.3.10
- Subnet: 255.255.255.0
- Gateway: 192.168.3.1
Step 3: Configure Router Interfaces
We will need to configure the IP addresses we have listed above to each router's interface.
R1:
enable
configure terminal
interface gig0/0
ip address 192.168.1.1 255.255.255.0
no shutdown
exit
interface gig0/1
ip address 10.0.12.1 255.255.255.252
no shutdown
exit
write memory
- G0/0 is connected to the PC0, So we will assign a private IP to serve as the default gateway
- G0/1 connects to R2, and it will be using the /30 subnet range
R2:
enable
configure terminal
interface gig0/1
ip address 10.0.12.2 255.255.255.252
no shutdown
interface gig0/2
ip address 10.0.23.1 255.255.255.252
no shutdown
exit
write memory
- R2 acts as the middleman between R1 and R3, we will give it IPs on both point-to-point subnets.
R3
enable
configure terminal
interface gig0/1
ip address 10.0.23.2 255.255.255.252
no shutdown
exit
interface gig0/0
ip address 192.168.3.1 255.255.255.0
no shutdown
exit
write memory
- G0/0 serves as the gateway for PC1
- G0/1 connects to R2
Step 4: Configure Static Routes
Each router only knows about its directly connected network. To allow full communication, we manually add static routes to tell where to forward traffic.
On R1:
configure terminal
ip route 192.168.3.0 255.255.255.0 10.0.12.2
exit
We're telling R1 to reach PC1's network and send packets to R2.
On R2:
configure terminal
ip route 192.168.1.0 255.255.255.0 10.0.12.1
ip route 192.168.3.0 255.255.255.0 10.0.23.2
exit
R2 is the central router and needs to route both ways:
- Towards PC0 via R1
- Towards Pc1 via R3
On R3:
configure terminal
ip route 192.168.1.0 255.255.255.0 10.0.23.1
exit
We're telling R3: To reach to PC0's Network, send packet to R2
Step 5: Test Connectivity
Now that the routes are in place, let's test communication:
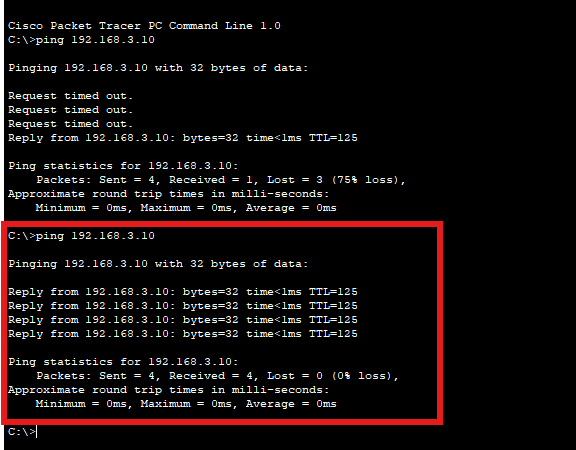
- On PC0, open the command prompt and run:
ping 192.168.3.10
- Then try from PC1:
ping 192.168.1.10
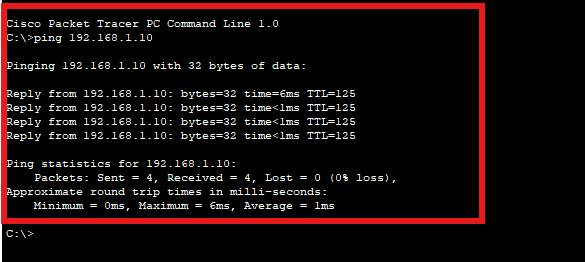
Nice one! Everything seems to be connected, and both computers are able to communicate with each other.
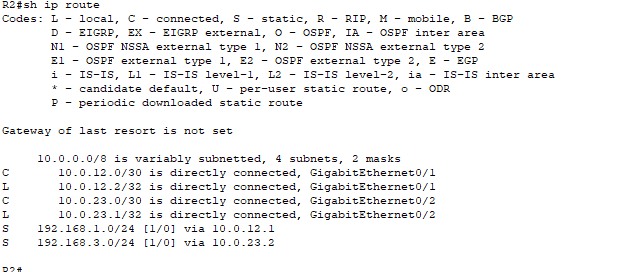
Step 5: Verify Routing Tables:
Check the routing table on each router:
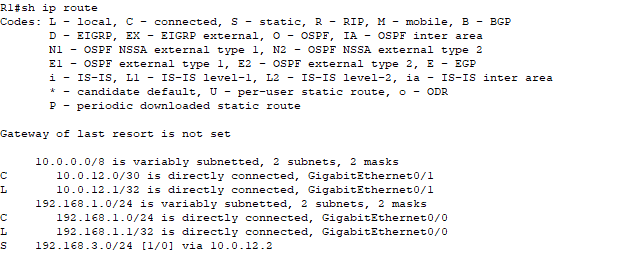
show ip route
R1:
R2:
R3:
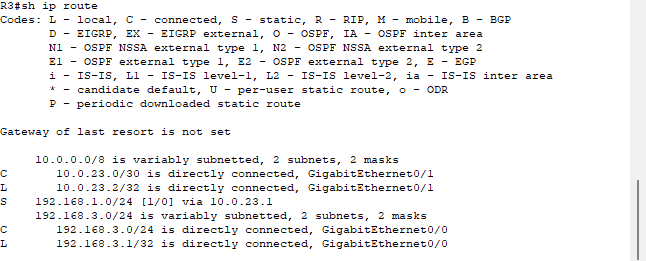
You should be able to see:
- C: for connected networks
- S: For static routes
Conclusion
In this lab, we set up a straightforward network using static routes to control how traffic moves between routers. It might seem simple on the surface, but this kind of manual configuration is a great way to understand what's really happening behind the scenes in a routed network.
By adding each route yourself, you're not just making devices talk to each other, but you're learning how routers think, how they build their routing tables, and how to troubleshoot when things don't go as planned.
I hope you found this guide helpful, and Happy Networking